

Trying to setup android studio on Windows? This post will show you easy step-by-step process on how to setup android studio on Windows. The official Integrated Development Environment (IDE) for creating Android apps is called Android Studio, and it is built using the IntelliJ IDEA program from JetBrains. When developing Android apps, Android Studio offers many great features that increase efficiency, including:
- A hybrid environment where Android device development is possible
- Use Apply Changes to update code and resources without having to restart the application.
- A flexible build system based on Gradle
- A feature-rich, quick emulator
- Integration of GitHub and Code templates to let you create typical app features and import sample code
- Comprehensive testing frameworks and tools
- Support for NDK and C++
- Built-in support for the Google Cloud Platform, which makes it simple to integrate services like App Engine and Cloud Messaging.
System prerequisites
- Windows 7, 8, and the 10 (32-bit or 64-bit)
- 4 GB RAM is required, however 8 GB RAM is advised (plus 1 GB for the Android Emulator)
- Minimum disk space requirement is 2 GB, although 4 GB is advised (500 MB for the IDE plus 1.5 GB for the Android SDK and emulator system image)
- Minimum screen resolution of 1280 x 800
Installer’s Manual
Step 1: Head over to this specific link to acquire the Android Studio executable or zip file.
Step 2:Download Android Studio button

After selecting the download button, check the box that says, “I have read and agree with the following terms and conditions.”
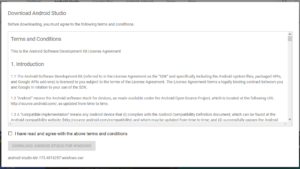
The popup box will open with a Save file button; click on it to begin downloading the file.
Step 3: Open the downloaded file and run it after the download is complete. The following dialog box will appear.
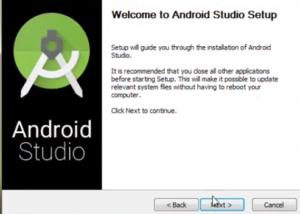
Select next. It will request a path for installation in the next prompt. Next, hit the path you’ve selected.
Step 4: The installation will begin, and after it is finished, it will look like the image below.

Select next
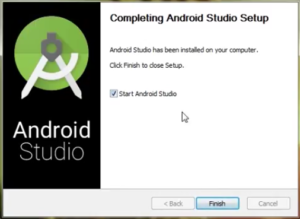
Step 5: After selecting “Finish,” a prompt will appear asking if the prior settings should be imported [if the Android Studio has previously been installed]. The “Don’t import Settings option” is the better alternative.
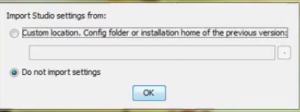
Choose the OK option.
Step 6: The Android Studio will launch at this point.
It will search for the accessible SDK parts in the interim.

Step 7: The Welcome dialog box will be displayed after it has located the SDK components.
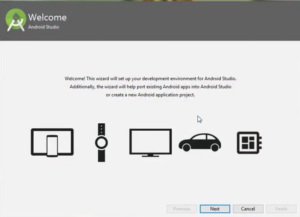
Select Next.
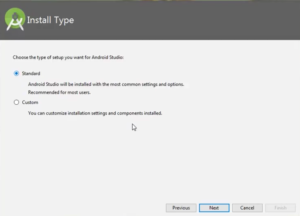
Select Standard, then click Next. Select between the Light or the Dark theme at this point. The dark one is known as Darcula, while the light one is called the IntelliJ theme. Select as necessary.

Select the Next option.
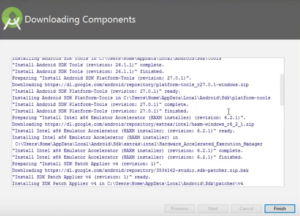
Step 8: The SDK components should now be downloaded.
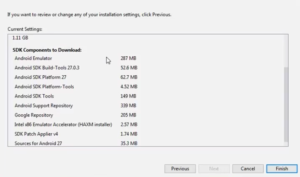
Select Finish. Let the download of the components finish.
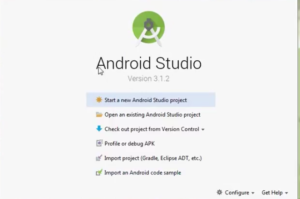
The configuration of the Android Studio has been accomplished. The time has come to release and create apps. To start it, click the Finish button.
Step 9: To create a new app, select Start a new Android Studio project.